There are different nail application techniques: resin, gel and acrylic. The acrylic nail application technique is one of the most widespread in the United States and Europe. In this article, the nail expert Maryton will show you the steps of applying acrylic nails. Just keep reading!
Here are the steps:
- Prepare your nails for nail application.
- Apply acrylic primer.
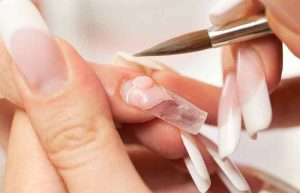
- Place the template under your natural nail, so that your nail covers part of the template. Bend the template so that it is in line with your nail and follows the natural curve of your nail.
- Apply primer again, without letting it dry.
- Immediately apply a ball of acrylic to the middle of your nail and work it by stretching it over the template and giving it the desired shape.
- Apply a slightly larger ball of acrylic to the stress point of your nail.
- Finally, apply a thin ball of a little more liquid near the cuticles and stretch it.
- Let the resin dry a little and pinch the sides of your nail with pinching pliers or your fingers.
- Pinch the template to remove it.
- File with a coarse grain to form the nail, then with a file with a finer grain and finally finish with a buffing block.
- Clean your nail with alcohol and apply a top coat.
Hoping that this article has pleased you and will give you ideas! In addition, I recommend investing in some professional manicure kits to care for your nails.
Read also: The chrome effect or “Chrome Nails”
You must log in to post a comment.